
When I thru-hiked the PCT in 2023, I really thought that it was going to be a once-in-a-lifetime thing. Try anything once, right? Get it out of your system?
Anyone who has ever thru hiked will know how naïve I was. Now I’m hooked. I watch and read more PCT content than I ever did before I had hiked it. So I’m headed back to trail.
This year, I’m attempting to combine the Continental Divide Trail and the Great Divide Trail northbound, starting on April 21st, targeting completion of the CDT on August 11 and hoping to finish at Kakwa Lakes GDT terminus around the middle/end of September.
What a dream it would be to cross the spine of the Rockies from one end of a country through to another, as far north as the trail will go!
August 12, 2025 will be my third year in a row of celebrating my birthday on a long-distance trail — and it’ll be my 30th birthday, so I wanted a challenge worthy of celebrating the end of a decade.
From the research I’ve done, it seems there are many who have toyed with this idea, but ultimately given it up. Constraints with seasonal timing make a northbound attempt the most reasonable direction, but coordinating day-by-day campsite reservations on the GDT after 3000 miles of uncertainty and alternate options on the CDT is a logistical nightmare, and hikers will surely have to contend with a snowy Colorado. So far I’ve only read reports of one man, Andrew “Peanut” Glenn, completing this link-up in 2019.
I’ve now spent the last five months researching and preparing for this hike — which I’ll start in a week (!). This is a condensed list of everything I researched and did to prepare:
- Research Great Divide Trail alternates and make decisions on which I hope to take
- Talk to people who have hiked the GDT to try to estimate what my daily mileage might reasonably look like, given its anticipated difficulty over typical American long distance trails
- Research weather conditions on the Great Divide Trail to understand the ‘drop dead’ date I need to exit the trail by (e.g., when does winter arrive?)
- Create a day-by-day itinerary to identify which GDT campsites I’d hike to and would need permits for, and build in 3 different options for pacing (fast, target, and slow)
- Work backwards to figure out what date I would probably need to finish the CDT and start the GDT to be safely off trail before winter hits
- Research Canadian backcountry permit systems and booking dates
- Book GDT campsites (this was much more complex than I’d expected, given the system is not set up to accommodate thru-hiker mileage and itineraries)
- Buy general Canadian park passes (Alberta and Parks Canada)
- Research timing ranges for entering the Colorado section of the CDT based on historical snowfall
- Research the many possible CDT alternates
- Chat with friends who have hiked the CDT to estimate what my pacing might look like for each state
- Create a day-by-day itinerary and map of the version of the CDT I plan to hike
- Load the .gpx files onto my watch for easy navigation
- Research the trail towns along both trails and make a resupply plan
- Research conditions on both trails re: water, snow, bears, lightning, weather
- Overhaul my gear list, reducing my pack weight by about 3 lbs and simplifying or making some of my trail and town routines more efficient
- Troubleshoot nutritional gaps from past experiences on trail, including testing many many versions of different cold-soaked recipes and trying different carb mixes to combat my inability to eat solid food when feeling nauseous on trail
- Purchase, decant, and sort about 80 days’ worth of trail food that will be mailed to me
- Figure out basics like subletting my apartment, finding insurance coverage, wrapping up at my place of employment, and making plans for work/housing after the trail
- Attempt to maintain some minimum level of cardio & strength conditioning
In the hopes that it might help you someday attempt this link-up, here are my thoughts on my preparation.
 Researching alternates in the Wind River Range.
PERMITS & ITINERARY
This is easily the most difficult part of planning this link-up. Since many parks on the Great Divide Trail do not allow wild camping, to respect Leave No Trace principles and camp in designated areas, I needed to plan out exactly which sites I planned to camp at. To do this, I also had to research the trail conditions (some remote parts of the GDT are more challenging to navigate than other more popular areas) and alternate options along the Great Divide Trail to get a more accurate sense of what kind of mileage I would be hiking day by day.
The Great Divide Trail Association website hosts a spreadsheet with all of the campsites, permits, and sample itineraries. By triangulating all of these resources, I created my own itineraries for a range of paces and booked overlapping campsite schedules:

This was not easy to do, because the parks’ booking pages are not structured to support a thru-hiker’s itinerary. Booking two sites that are too far away from each other will trigger a warning that the distance is too long — a useful feature for the standard hiker, but frustrating for a thru-hiker hitting longer days. For my purposes where I’m booking overlapping itineraries to cover different potential pacing plans, I also received triggered pop ups saying that my itineraries were overlapping, and I would have to add my camper profile again as a ‘new’ person.
Each site must be booked from the trailhead someone might use to access the campsite, and can only be booked per ‘itinerary’. For example, you must check out your cart after you’ve booked the three sites you’ll supposedly access from the Poboktan trailhead, before booking sites you’ll supposedly access from the Maligne Lake trailhead (I say ‘supposedly’, because of course on a thru hike, you would be walking through directly). In a time-sensitive lottery where campsites are disappearing in minutes, this is stressful! In the end, booking permits and parks passes cost me $355.
I made these bookings in late January, but by March once I had more of my CDT plan fleshed out, I realized some of these dates I’d booked were now one or two days off. I have only two campsites that I wasn’t able to fix, where the campsite is fully booked for the day I think I’ll be there, and campsites nearby are also fully booked. We’ll have to see how things shake out in a few months.
Another difficulty with preparing a CDT + GDT combined route is the number of alternates on the CDT, which make it difficult to estimate the exact mileage / pacing each state might take. I wanted to try to stick as close as possible to the most ‘standard’ CDT in the sense of taking the alternates that the majority of CDT hikers take. I researched each alternate on the CDT and calculated the mileage by loading each alternate into my own CDT + GDT CalTopo map, which also includes all of the resupply locations I’m planning to use:

This is certainly the most structured approach I’ve ever taken to a thru-hike. Normally I appreciate having more flexibility in which towns I stop in or which alternates I take, and I prefer to have the research available to be able to make choices from the trail. But given the time constraints and the scale of what I’m trying to hike, I needed to make the choices for six months of a hike in advance, so that when I’m on trail, I’m just executing. This is a trade off I’m making to be able to make the link-up happen.
 My friends’ kitten Marnie observing my cursor on CalTopo on the big screen.
RETHINKING GEAR
I made several significant changes to my gear from what I’d brought previously on the Pacific Crest Trail and Colorado Trail. On the PCT, I started out aiming to be as light as possible. As the PCT was my first thru hike, I spent a lot of time researching what it meant to hike in an ultralight way. I transitioned my original backpacking set up (a 16 lb base weight) to an 11.5 lb base weight by swapping out my pack, switching to a quilt, replacing my freestanding tent with a tarp and bivy combo, learning to use lighter stakes with better technique, and going stoveless.
My philosophy was to start with as low a comfort level as possible and add back items if I really felt their absence. Ultimately I hit a balanced approach of being ultralight to my level of comfort but added back things like a sit pad and sandals to wear in town over time.
On the Colorado Trail, I kept the same set up, but quickly realized my kit was not good enough for rain. The PCT was a very mild trail in terms of the number of days with rain, while I was soaked in afternoon thunderstorms most days of the Colorado Trail. I had to find a more effective way to keep warm when wet.
I also noticed in my thru-hiking on the PCT and the CT that there were inefficiencies in some of my on-trail and in-town processes. On a backpacking trip here or there, you may not notice these and they may not make a big difference – but over weeks and weeks, I knew there were things I could do to address these.
These were the changes I made:
 On Handies Peak, a 14er in the San Juans range, off of the Colorado Trail.
1. Resting my shoulders:
When I was carrying more than 5 days of food, I noticed I needed to stop to give my shoulders a brief 1 min micro-break, particularly when I lost weight over the course of a thru hike and my hip belt no longer fit snugly.
So I decided to switch from my custom KS Ultralight pack to a lighter-weight Pa’lante Ultralight that ditches the hip belt entirely (saved over 200g) and commit to trying to keep my pack at or less than 22 lbs loaded up with 3 – 4 days of food. My hope is that this enables me to move more quickly, cover more mileage daily (and carry fewer days of food as a result), and climb more quickly.
In purchasing my custom KS Ultralight for the PCT, I had opted for a lot of add-on features that I realized I didn’t end up using or needing. Now with more experience, I was ready for a more streamlined pack.
Another benefit of a pack without a hip belt is that the time to take off or put on the pack is faster, and the Pa’lante closure mechanism is faster and can be done one-handed (again, I was really looking for anywhere I could save time, over weeks and weeks of hiking).
As an added bonus, the Pa’lante bottom pocket appealed to me as a bigger pocket for me to put snacks where previously larger snacks (e.g., Lenny and Larry’s cookies) might not fit in a hip belt pocket.
2. Filtering water:
This was absolutely my biggest gripe. I previously used a standard 1L Smartwater bottle and 750ml Smartwater bottle with a sport cap, a Sawyer Squeeze filter and coupler, and a CNOC bladder. I would fill the bladder with raw water, then gravity-filter it off a nearby tree for 15 – 20 minutes. Super low effort, but I began to get tired of waiting for it to filter.
Squeezing the water through started to create pinhole leaks in my CNOC bladder over time, which sent me on a search for someone with superglue to seal it. Carrying the whole gravity setup while I continued walking meant it often spilled since it required me to leave the connection loose so that air could escape while water dripped into my bottle.
So I swapped to a soft flask to soft flask filtering setup where the connection can be airtight: I filter from a CNOC bladder into a CNOC 500ml soft flask, and I have a Hydrapak 28mm bite valve cap (the threads needed some Teflon plumbing tape to prevent leaking since CNOC and Hydrapak have different thread patterns, but otherwise it works great).
Incidentally the soft flask fits a lot better in the built-in shoulder pocket of my new pack as well, and I can drink from it without even removing it from the pocket.
 In desperation in one very exposed section above treeline, I sought shelter in an off-camber bank just off the trail when it was getting late and I wasn’t sure if I’d find a better site. The sleeping pad with a shoe propped underneath helped keep me from slipping downslope.
3. Setting up & breaking down camp:
For a couple weeks on the PCT, my Thermarest inflatable sleeping pad would deflate overnight and I couldn’t solve the leak since it was at the valve and would require a warranty replacement. I slept on a CCF pad and learned to get used to it.
I still prefer the inflatable as it expands my range of comfortable campsites and allows me to easily adjust an off-camber campsite by throwing a shoe underneath one side of the pad. But I grew tired of the 30 or so breaths it took to inflate it and the time it took to roll it back up every morning.
I’m planning to start with a torso-length CCF pad on my hike this year (which I also trimmed further to remove another 0.5 oz of excess material) to minimize camp set up and take down time. When I hit snow, I plan to add a torso-length vintage version of a Thermarest. The old valve mechanism lacks an airlock so it’s less efficient to inflate, but that’s a compromise I’ll make in Colorado.
4. Staying warm when wet:
On the Colorado Trail, I went to bed wet and cold several times and that was enough for me. My pack liner failed. I draped my tarp over myself and my pack to try to protect my pack, but everything wetted out. Sleeping in a soaked quilt provides very little warmth, and my down jacket was useless. On one occasion (the night before my birthday on trail), I was caught in an overnight storm that rained so hard even the spot I thought was protected from pooling water became flooded. My inflatable sleeping pad was my lifeboat. Another time, I was camped at a trailhead
I also dealt with plenty of ‘car washes’, aka overgrown wet foliage that soaks your shorts and shoes when you pass by. I’ve previously used poles to knock off as much water as I could, but everything eventually gets wet.
So I’m making changes this year to accommodate being wet while trying to preserve warmth as much as possible.
 My gear the morning after being flooded overnight.
Changes I made:
- Knowing I rarely need a down jacket for static warmth since I’m only at camp to sleep, I’ve switched to two fleeces (one with Polartec Alpha fabric, one microgrid) which are warm even when wet so long as I’m moving.
- I replaced my Amazon dance pants with custom Timmermade Hyper-D wind pants in the same cut that allow me to get the pants on and off without taking off my shoes.
- I added an Lightheart Gear rain wrap that I can put on to protect myself from car wash drips.
- I reinforced my pack liners with tape, and plan to add a turkey oven bag if needed to protect just my quilt.
- I swapped my slightly breathable Montbell Versalite rain jacket for a non-breathable custom rain jacket by LEVE Outdoor Co that maintains more warmth when wet (and has pit zips for ventilation to try to prevent sweat buildup). Cameren, LEVE’s owner, was extremely helpful in making me an XXS size that worked to my dimensions and preferences.
 Worth getting wet for views like these on the Colorado Trail.
5. Charging in town:
I often stayed overnight in town because I didn’t know how long my battery packs took to charge.
This time, I upgraded my Nitecore Gen 2 power banks to Gen 3 with dual-USB C ports and timed a number of different cable and wall charger options to check the speed. The Gen 3 power bank in combination with a 4-inch 100W cable and my Anker dual-port wall charging block can charge to full in 3 hours.
My hope is that this will allow me to make my time in town more efficient: find a secure place to charge my powerbanks adding up to 3 hours while I do my town chores (laundry, a bathroom where I can clean things, resupply, eat something in town) and be on my way again.
I also swapped iPhones to a new phone with a USB-C port, allowing me to ditch my Lightning cable, which has failed on me three times over the course of my thru hikes. Now that all my cables are USB-C, I’ll carry two cables for backup.
6. Applying sunscreen:
This is a small change, but I’m swapping to a sunscreen stick this year. I’m looking for something faster than squeezing and rubbing in sunscreen in cream form. It’s less effective than using a cream-based sunscreen (though it’s better than a spray-based sunscreen), but since I’m stopping to apply sunscreen every 2 hours, I wanted something that’s faster than getting a larger and heavier bottle out of a side pocket.
I’ve picked up some sticks by Joshua Tree Skin Care — which is tiny and fits in my shoulder strap pocket, along with a dedicated cream-based face sunscreen — and we’ll see how it works out. One gripe that I have with sunscreen on trail in general is that the oil makes it easy for small bugs and dirt to stick to your legs (on the Colorado Trail, I scraped off the dirt with a small knife). Hopefully the stick fares better.
 Sunscreen oil makes the dirt and little bugs stick to your body as you hike. The very visible scar on my knee is from the Sierra, and the other two are from an ACL repair 🙂
7. Other small swaps / additions:
- I switched to toothpaste tabs in waterproof plastic containers where I had used plastic bags before (which eventually broke down and made the toothpaste tabs soggy).
- Added a floss pick. Found one with a rounded tip (not a pick) so it doesn’t damage my bag.
- I swapped a pocketknife for microscissors and tweezers.
- I swapped a standard mini Bic lighter for an even smaller titanium peanut lighter (same weight, but less volume, and I cold soak so I only need a lighter for emergencies and for sterilizing needles).
- On the PCT I didn’t carry a sewing kit but ended up borrowing them frequently from friends to patch up shorts, gloves, sleeves, etc — so this year, I’m carrying one.
- One town chore I routinely would stress over (because I was afraid of forgetting!) was replacing my stash of toilet paper. I’m switching to a bidet and adding more soap to my kit to try to reduce my reliance on toilet paper.
- I’m trying the new Durston Iceline trekking poles this year. They seem as strong if not stronger than the lightweight Gossamer Gear poles I had used previously, and my complaint with the GG poles was that the tip eventually wore away. I also had to replace sections a few times when they broke under heavy use (e.g., used as a brake when glissading).
- I swapped a cork massage ball (which never worked for me because it requires a hard surface like a rock for it to really get into your muscle, and I was frequently trying to use it at camp on soft dirt) for a Friesen Gear 3D printed massage roller that stays on my trekking pole. Easier to access and use.
- I ditched my headlamp (!) for a clip-on flashlight. I previously never wore caps because I disliked wearing them and would then lose them, which also meant I needed a light source that didn’t require a cap to clip onto. Now I have a cap that is lightweight but stays on my head well, and will be using a flashlight instead — better battery life in a smaller and less fussy package, but just as bright.
Though I’ve tested this setup off trail, I’m sure once I use these on trail for weeks on end, I’ll find other tweaks to make this setup even better.
Lighterpack link here & duplicated in my Trek gear list.
 Drying out my gear the morning after a wet night, while I slackpacked a 14er.
TRAINING
I’m the worst; training was definitely deprioritized. I’m generally fairly active in my off-trail life, racing for a bike team in New York, skiing and touring in the winter, etc. All I can say here is I was still coming out of my post-trail depression in the last half a year since completing the Colorado Trail, and had a lot to process as I figured out what I would do about work and whether I was really going to leave my job to do this. I did read the amazing resource Training for the Uphill Athlete, which I borrowed from my sister, a climber. I wanted to run more than I ended up doing to give myself ‘time on feet’. I’m leaning on my body maintaining its memory and being able to recondition quickly, and on my own knowledge of my own body and what it can handle. A few things I did do are spend most of my work hours standing, and often carrying a fully loaded pack for hours at a time around the house.
 On my touring skis in the fresh snow behind my sister’s house in Missouri, dragging a deflated air mattress that was being used as a sled. January 2025.
DIALING NUTRITION
This is critical. On the PCT I was able to sustain high levels of calorie intake by consuming a lot of sugary, processed foods. I went through a jar of Nutella every few days and relied on Oreos more than I should have. When I got my blood tested at the end of the PCT, the doctor told me I was at risk for pre-diabetes.
On the Colorado Trail, I tried to take in more fiber and significantly increase my protein intake. But on that trail, I also added on 27 of Colorado’s 14-er peaks (peaks over 14,000 feet in elevation).
This meant I was frequently pushing nonstop (limited breakfast, no lunch, very few snacks) to summit and safely descend below treeline before the afternoon thunderstorms rolled in. Without the regular intake of calories, I wasn’t able to meet my calorie needs, especially at altitude.
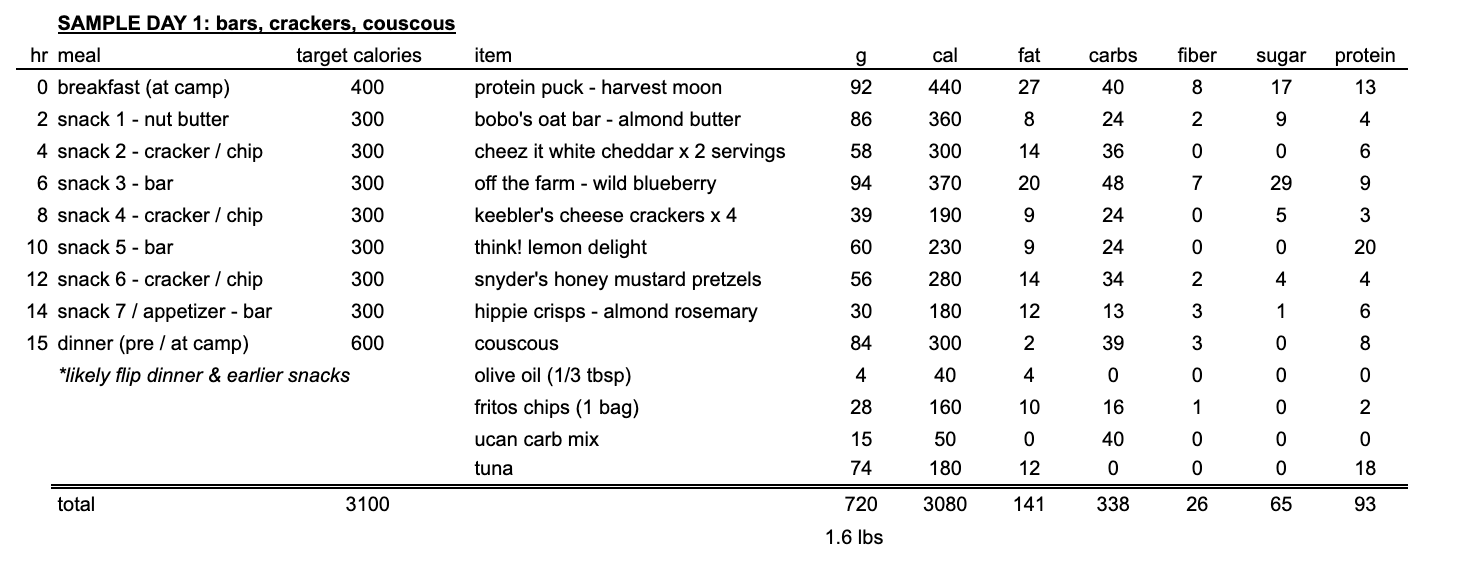
I was frequently so hungry I felt too nauseous to eat, I was breathing too hard to eat solid food on the uphill, and I was often unable to stomach 800+ calories worth of dense cold-soaked couscous & tuna for dinner which would leave me sluggish the next day.
For a comparison of my calorie expenditure, on the PCT I was burning between 2600 – 3500 calories a day, but on the Colorado Trail I was hitting 3300 calories or more, most days. On the PCT I lost 12 lbs (about 10% of my body weight) over the course of five months; on the Colorado Trail I lost 7 lbs in 30 days.
Another issue was that even though I already cold soak for the sake of simplicity (e.g., not needing to boil water and resupply fuel regularly), I was too tired to even bother figuring out water to make my meals.
Sometimes I tried to eat my lunch or dinner while moving to keep up momentum — any stop longer than a few minutes is more difficult to restart from. I repeatedly would choose to eat snacks as opposed to making a meal.
 A thru-hiker’s diet.
Changes I’m making this year to my nutrition:
- Maintaining a focus on sufficient protein intake daily
- Adding carb mix powder to my rotation so that I can take in fluid calories on the uphill
- Swapping out lunch for additional snacks, which is already my preferred pattern — but this will reduce the time I sit around soaking / eating a lunch and reduce my reliance on needing to eat lunch around or near water for my food. I used to have breakfast, lunch (mashed potatoes), dinner (couscous), plus 6 snacks (bars or chips/crackers) and a couple extra nut butter packets as a holdover. This year, Iplan for 7 snacks a day and add a lot more textural variety to my dinners (chips, olive oil, carb mix) to make it more palatable.
- Packing more food in advance and shipping resupplies for more variety and to save time in town (so long as I get to the post office on time!)
A sampling of two days’ worth of food:

Another major change: my dear friend Jenna started a home bakery this year and offered to play around with dehydrating meals that work for my particular cold-soaking preferences. She’s already made several high-protein cakes and meal bars (including savory meal bars, a dream of mine!) that we’ll vacuum seal for the trail. And she makes a divine sourdough granola that is high protein and soaks well with milk and could become my new favorite breakfast-for-dinner option. I’m very excited for this — she and I have worked together with my nutritionist Hayley (who has herself thru-hiked the Long Trail!) at Culina Health over the last year to dial in my plan here.
I think there’s a gap in the market for variety in cold-soaked packaged backpacking meals, because the intuitive primary route would be to boil water for backpacking meals, dehydrate your own food, or rely on the same variations of couscous, ramen, mashed potatoes, and rice and beans. I’m excited to be exploring alternatives. If you have ideas to share or want to collaborate (or if you want to place a mail order!), please do comment or reach out to Jenna via email or Instagram!
 A sample of the high protein breakfast cakes Jenna made me.
In summary…
Primarily, the changes I’m making overall are meant to reduce my brain’s overhead: all of the calculations or choices I have to make on trail and in town. This is obviously a very different approach from a standard thru hike, where you want to immerse yourself in the moment and take things as they come. I fully recognize that these choices sound a little obsessive. But when you’re doing this day in, day out for weeks on end… I think it matters! Let’s see how it ends up working out 🙂
 Photo taken by my friend Harry Zernike.
 xx
stitches
; Días de PCC 13 a 15")

